
Hello again, and thank you for returning. I hope if you are here at this point I am not writing this for the well seasoned pro (despite the fact that they are all welcome to read it!) but for person looking to understand their camera better, improve their photography hobby or just their pictures at home, and gain the confidence to make and share their photographs! Most of all, I hope if you are back, and you understand my mission statement, that you are back because I have helped you in some way. I am going to discuss a subject that every photo blog has written about, but often manages to overcomplicate: depth of field. 
- What is depth of field.
Depth of field is, in the long way, the distance between the closest and farthest objects in a photo that appear acceptably sharp. To put it another way, it means what is in focus and what is not. Observe the picture of my grandfather again. I chose it partly because, yes, I am still on that, but because it has a clear object in the background that I can point to. See my grandfather, mostly in focus, and then observe opposite of him, the nice red bucket. The bucket is blurry! This photo has a shallow depth of field. Some people like to use the term “bokeh.” I do not. If you hear one of the many pronunciations of that word, or see it written, it is describing that blurry background. Most people who are googling this subject for the first time, they are trying to achieve that affect, it is desirable, and it is what a recent generation of iPhones was sold on. People wish to achieve it because it is what they see in professional portraits and “good photographs.”
Achieving that effect, and the photographic fundamentals are what we will really be talking about and how to do it with the lens you have rather than convincing you to spend a few car payments on a prograde lens.
Aperture
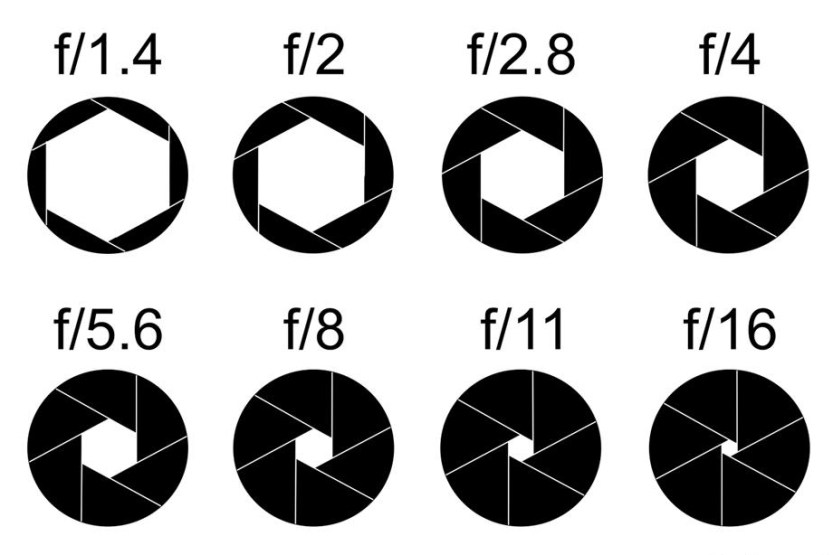
Aperture is what people mean when they talk about F-stops, or when you see something like f/1.8. In simple terms, of the three fundamentals of exposure, it is how widely does the lens open when a photograph is made. The wider it opens the more light that is allowed in. If it is a small aperture then it allows in less light, but it is much more focused.
- The bigger the number, the smaller the aperture, it is like shotguns: the smaller the number, the bigger the shell.
- The bigger the maximum aperture, the more expensive your lens is going to be.
Really that is the basics to it. If a lens has the ability to hold a constant aperture and zoom, you are now adding dollar signs. The 50mm 1.8 we mentioned in the last entry is a great choice for being affordable and having the ability to go to f/1.8. Most people want this for achieving a shallow DOF, or for the ability to work in less light. If you want a much more jargon heavy and technical explanation of the information I am giving, they are out there.
With what I have said so far, we have established that, in my opinion, the understanding that a bigger aperture allows you to create a shallow DOF is what drives most people out to seek a new (and often expensive) lens. Let us examine the rest of the principle though.
Factors which affect your depth of field
- Aperture is the most common and the one that most people first learn to understand.
- The focal length of the lens.
- Distance from the subject to the background.
The second two are important! It is how you are going to achieve that effect with your kit lens and zero digital manipulation for blur (looking at you iPhone portrait mode.)
The focal length of the lens is how far does it zoom. Remember, prime lenses do not zoom, but the longer ones, like my 135 are still telephoto. The longer your lens, the less depth of field you will have. The distance from the subject to background is easy, that is how far from the brick wall, woods, or whatever it is, is your subject standing. With the kit lens that came with your camera, you could achieve that professional looking shallow DOF by firstly, zooming in on your subject, and secondly but moving them farther away from the subject (use your feet!) You may have to then back yourself up to still get the image you want (use your feet!) Let us examine the examples I have prepared, this is the fun part! My son Liam volunteered (due to not having a choice) to help, while my other son tried to distract him. Note: I did crop some of the photos and level them out, however, for each photo, I stayed in the same place.

50mm, f/1.8, 1/125. Distance: touching.
Here, Liam has his back touching the bookshelf. The spines of my science fiction novels behind him are clearly readable despite the aperture being wide open. 
50mm, f/1.8, 1/125. Distance: 6″
The only thing that has changed in this photo is Liam is six inches away from the bookshelf. The titles are still legible, but even with only six inches, they are slightly out of focus.

50mm, f/1.8, 1/125. Distance: 12″
Moving him another six inches, to make full foot, has created significant blur with the maximum aperture of my lens.

50mm, f/1.8, 1/125. Distance: 18″

50mm, f/1.8, 1/125. Distance: 24″
At two feet the book titles are out of focus entirely, but you can still tell they are books, but a wonderful effect is created and now my subject really stands out while still having a nice background! Now lets see what happens when we decrease our aperture.

50mm, f/5.6, 1/125. Distance: 24″
He has not moved any closer, but the smaller aperture has brought the books back in to focus some, and has made the effect of the distance between Liam and the bookshelf being less exaggerated. 
50mm, f/8.0, 1/125. Distance: 24″
The blur is gone mostly. The smaller aperture has not only increased the depth of field, but (as we will talk about another time) the entire photo is now sharper. Referring back to the photos taken at 1.8, you will notice that often, focusing on the subject’s eye will leave even their ears out of focus at that aperture.

50mm, f/11, 1/125. Distance: 24″

50mm, f/11, 1/125. Distance: 24″
Everything is very sharp, and we have experienced some light loss. This was all done with the same prime lens. I promised you could do this with the lens that came with your camera if you are willing to manipulate things other than the aperture. Let us use the 28-80mm f/3.5-5.6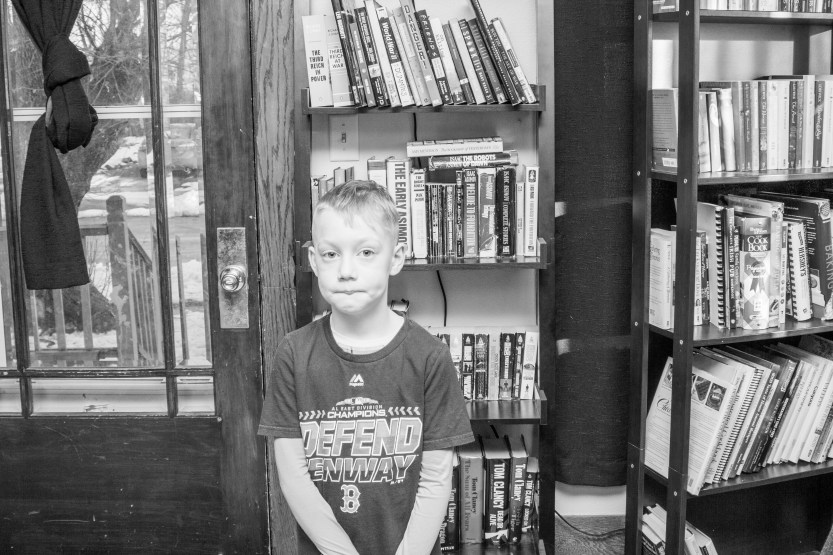
28mm, f/8.0, 1/125, distance: 24″
He is still the same distance from the bookshelf, but now not only have we decreased our focal length but our narrow aperture has created a depth of field where not only are the books in focus, but so is part of my porch, which is six feet from the door he is two feet from.
80mm, f/8.0, 1/125, distance: 24″
Here, only one thing has changed and that is that I have taken that lens and zoomed it to its maximum focal length of 80mm. Even the aperture is narrow, but now so is the depth of field due to the longer focal length. I have created a shallow depth of field, using a very inexpensive kit lens, not with a wide aperture, but by using a longer focal length and distance from subject to background!!!!

80mm, f/5.6, 1/125, distance: 24″
Here I just widened the aperture a little, to the max of the lens when zoomed, f/5.6. It did not make a large difference. The sweet spot, near the middle of the lenses aperture range, isn’t far from this, and it just reinforces the point that it was not the aperture creating that effect.
28mm, f/5.6, 1/125, distance: 24″
To highlight even more the ability to use focal length, here is the same thing, but zoomed back out to 28mm. There is now a much deeper depth of field. The books are little blurred, but not enough to achieve the effect you want, and you can still make out the parts of my porch.

85mm, f/1.8, 1/125, distance: 24″
I switched to one of my very nice prim lenses for this one. I have told you that you can create those effects with your kit lens, and I am not lying to you. My goal is to show you how to do more with what you have, but I would hate to leave you with the impression that people buying lenses are doing so out of vanity. This lens is only 5mm longer than the max zoom of that kit lens, but it is a prime, has a lot more glass, and a max aperture of f/1.8 which I used here. Liam is still only two feet from that shelf, but it looks like miles, and if you hadn’t just spent the last half hour reading this, it may take a minute to figure out those were books behind him.

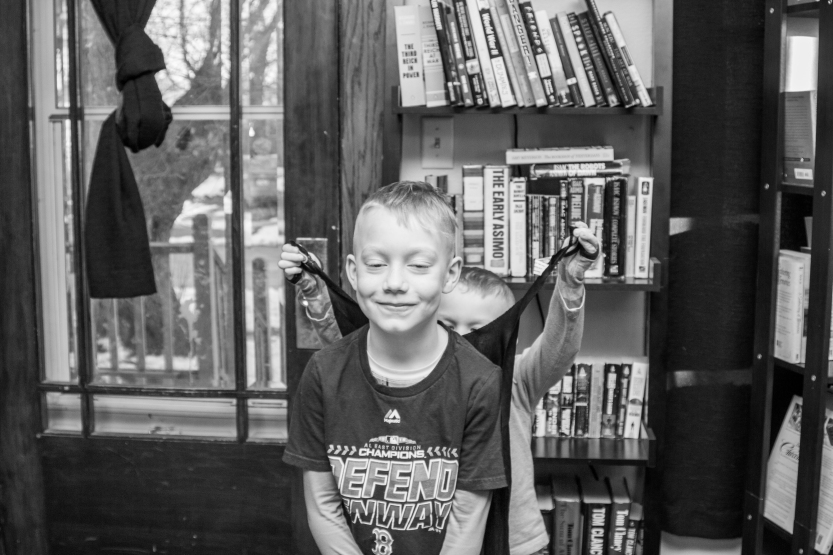
85mm, f/8.0, 1/125, distance: 24″
Same lens, cranked to f/8.0. That photo is razor sharp all the way through to his ears, however, the books still have a lovely blur, as does my son trying to put a cape on his captive brother. It still has the shallow depth of field because the focal length is longer and he is a little bit off from the background.
Your homework: bust out a kit lens, I do not mind which one, but preferably the one your camera came with when you bought it, and show me your ability to use your feet, employ focal length, distance between subject and background to get a shallow depth of field. Do not be dependent on aperture. You can comment them here, or tag me on instagram @nostalgic_vanity. If you do, do not forget our #nostalgicvanity tag.
In conclusion, it really can be that simple. Photography does not have to be about spending a fortune after you have already bought a camera, and you do not have to buy the camera and spend years drowning in information that does not make sense. You can improve your photography and get the effects you want today, with what you have for your DSLR or mirrorless now. If you understand some fundamentals employ them, you can start seeing the photos you want today. Now that I have loaded you up with this…I will have to address sharpness in the near future. Thank you!
Brandon Bledsoe
Owner Nostalgic Vanity Photography
931-436-4105
Instagram: @nostalgic_vanity
nostalgicvanityphoto@gmail.com
